Dec 24, 2020

100 MS Excel Shortcuts you must know


Hi Guyzz.........!!!!

When it comes to MS Excel, We all know its importance. Here today in this post we will see 100 Keyboard Shortcuts of MS Excel which are very very useful. After knowing these shortcuts we will inch closer to become an MS Excel expert. So without wasting any more time here are the 100 Keyboard Shortcuts of MS Excel:


1.     Ctrl + N: To create a new workbook.
2.     Ctrl + O: To open a saved workbook.
3.     Ctrl + S: To save a workbook.
4.     Ctrl + A: To select all the contents in a workbook.
5.     Ctrl + B: To turn highlighted cells bold.
6.     Ctrl + C: To copy cells that are highlighted.
7.     Ctrl + D: To fill the selected cell with the content of the cell right above.
8.     Ctrl + F: To search for anything in a workbook.
9.     Ctrl + G: To jump to a certain area with a single command.
10.   Ctrl + H: To find and replace cell contents.
11.   Ctrl + I: To italicise cell contents.
12.   Ctrl + K: To insert a hyperlink in a cell.
13.   Ctrl + L: To open the create table dialog box.
14.   Ctrl + P: To print a workbook.
15.   Ctrl + R: To fill the selected cell with the content of the cell on the left.
16.   Ctrl + U: To underline highlighted cells.
17.   Ctrl + V: To paste anything that was copied.
18.   Ctrl + W: To close your current workbook.
19.   Ctrl + Z: To undo the last action.
20.   Ctrl + 1: To format the cell contents.
21.   Ctrl + 5: To put a strike through in a cell.
22.   Ctrl + 8: To show the outline symbols.
23.   Ctrl + 9: To hide a row.
24.   Ctrl + 0: To hide a column.
25.   Ctrl + Shift + :: To enter the current time in a cell.
26.   Ctrl + ;: To enter the current date in a cell.
27.   Ctrl + `: To change the view from displaying cell values to formulas.
28.   Ctrl + ‘: To copy the formula from the cell above.
29.   Ctrl + -: To delete columns or rows.
30.   Ctrl + Shift + =: To insert columns and rows.
31.   Ctrl + Shift + ~: To switch between displaying Excel formulas or their values in cell.
32.   Ctrl + Shift + @: To apply time formatting.
33.   Ctrl + Shift + !: To apply comma formatting.
34.   Ctrl + Shift + $: To apply currency formatting.
35.   Ctrl + Shift + #: To apply date formatting.
36.   Ctrl + Shift + %: To apply percentage formatting.
37.   Ctrl + Shift + &: To place borders around the selected cells.
38.   Ctrl + Shift + _: To remove a border.
39.   Ctrl + -: To delete a selected row or column.
40.   Ctrl + Spacebar: To select an entire column.
41.   Ctrl + Shift + Spacebar: To select an entire workbook.
42.   Ctrl + Home: To redirect to cell A1.
43.   Ctrl + Shift + Tab: To switch to the previous workbook.
44.   Ctrl + Shift + F: To open the fonts menu under format cells.
45.   Ctrl + Shift + O: To select the cells containing comments.
46.   Ctrl + Drag: To drag and copy a cell or to a duplicate worksheet.
47.   Ctrl + Shift + Drag: To drag and insert copy.
48.   Ctrl + Up arrow: To go to the top most cell in a current column.
49.   Ctrl + Down arrow: To jump to the last cell in a current column.
50.   Ctrl + Right arrow: To go to the last cell in a selected row.
51.   Ctrl + Left arrow: To jump back to the first cell in a selected row.
52.   Ctrl + End: To go to the last cell in a workbook.
53.   Alt + Page down: To move the screen towards the right.
54.   Alt + Page Up: To move the screen towards the left.
55.   Ctrl + F2: To open the print preview window.
56.   Ctrl + F1: To expand or collapse the ribbon.
57.   Alt: To open the access keys.
58.   Tab: Move to the next cell.
59.   Alt + F + T: To open the options.
60.   Alt + Down arrow: To activate filters for cells.
61.   F2: To edit a cell.
62.   F3: To paste a cell name if the cells have been named.
63.   Shift + F2: To add or edit a cell comment.
64.   Alt + H + H: To select a fill colour.
65.   Alt + H + B: To add a border.
66.   Ctrl + 9: To hide the selected rows.
67.   Ctrl + 0: To hide the selected columns.
68.   Esc: To cancel an entry.
69.   Enter: To complete the entry in a cell and move to the next one.
70.   Shift + Right arrow: To extend the cell selection to the right.
71.   Shift + Left arrow: To extend the cell selection to the left.
72.   Shift + Space: To select the entire row.
73.   Page up/ down: To move the screen up or down.
74.   Alt + H: To go to the Home tab in Ribbon.
75.   Alt + N: To go to the Insert tab in Ribbon.
76.   Alt + P: To go to the Page Layout tab in Ribbon.
77.   Alt + M: To go to the Formulas tab in Ribbon.
78.   Alt + A: To go to the Data tab in Ribbon.
79.   Alt + R: To go to the Review tab in Ribbon.
80.   Alt + W: To go to the View tab in Ribbon.
81.   Alt + Y: To open the Help tab in Ribbon.
82.   Alt + Q: To quickly jump to search.
83.   Alt + Enter: To start a new line in a current cell.
84.   Shift + F3: To open the Insert function dialog box.
85.   F9: To calculate workbooks.
86.   Shift + F9: To calculate an active workbook.
87.   Ctrl + Alt + F9: To force calculate all workbooks.
88.   Ctrl + F3: To open the name manager.
89.   Ctrl + Shift + F3: To create names from values in rows and columns.
90.   Ctrl + Alt + +: To zoom in inside a workbook.
91.   Ctrl + Alt +: To zoom out inside a workbook.
92.   Alt + 1: To turn on Autosave.
93.   Alt + 2: To save a workbook.
94.   Alt + F + E: To export your workbook.
95.   Alt + F + Z: To share your workbook.
96.   Alt + F + C: To close and save your workbook.
97.   Alt or F11: To turn key tips on or off.
98.   Alt + Y + W: To know what's new in Microsoft Excel.
99.   F1: To open Microsoft Excel help.
100. Ctrl + F4: To close Microsoft Excel.


HAPPY LEARNING........>>>


Read More »

Nov 22, 2020

How to create QR Code for your WiFi


Sometimes we need to share our wifi details with our friends. Telling your password one by one to every friend is kinda boring. 

So today we will see how we can do it with a shortcut. 

All you need to do is go to the link below

LINK HERE

and fill your WiFi details. Then click generate QR code. 

A QR code will be generated. 

Make a printout and paste on the wall.

Thats it. 

Now anyone can connect without any issue. 


Read More »

Nov 1, 2020

How to check if a website is Safe/Unsafe


Hi Friends. 

We know the internet is full of harmful and unsafe websites. While some websites are constantly trying to steal our personal information, some other websites download malicious content on our PC. 

In todays post we will see even before loging in to a website how we can check if the website is safe or unsafe. 

Thanks to GOOGLE who has given us tool for that purpose known as GOOGLE SAFE BROWSING

All we have to to do is run the following URL with the website address we want to check and it will give us an instant reply if the website is safe or not. 

http://www.google.com/safebrowsing/diagnostic?site=websiteaddress

For example if you want to check my website www.tariqyousuf.tk then you have to write

 http://www.google.com/safebrowsing/diagnostic?site=www.tariqyousuf.tk

In your browser address bar. 

BINGO. 

Thats it. 

HAPPY LEARNING ❤❤❤


Read More »

Oct 30, 2020

Top 5 youtube tricks you didn't know.


Hi Friends. 

We spend quite some time on watching youtube everyday. So in todays post i decided to share with you 5 all important tips about youtube which are not commonly known. These tips will surely make your youtube experience better. 

So here we go. 

5 Cool tips aand tricks for youtube are here. 

When visiting any video on youtube Replace youtube with following things given in video url to see the magic

  1. Just Replace “youtube” with “listentoyoutube” in the URL and paste it in your address bar to download the audio of the video.
    Just Replace “youtube” with “ssyoutube” in the URL and paste it in your address bar  to download the video in any quality available.
  2. Just Replace “youtube” with “nsfwyoutube” and paste it in your address bar  to bypass age restriction.
  3. Just Replace “youtube” with “youtubeskip” in the URL  and paste it in your address bar and you won’t see ads.
  4. Just Replace “youtube” with “listenonrepeat” in the URL  and paste it in your address bar to repeat the video automatically .
  5. Just Replace “youtube” with “gifyoutube” in the URL  and paste it in your address bar to convert video into gif format .


Read More »

Oct 25, 2020

How to use Google Chrome Browser as notepad


Hello Friends. 

Today i will discuss how you can use your Google Chrome as a simple notepad. 

All you need to do is copy the following code into the address bar of your browser.


data:text/html, <html contenteditable>


Done. You can now simply write any note. 

Interesting fact is you can bookmark this page and use it any time. 

Thats all for now. 

HAPPY LEARNING. 


Read More »

Aug 8, 2020

How to take a good sound sleep

Hi friends.
The internet is full of surprises. There are websites for almost everything and everyone.
Today i am back with another such interesting website.
Sometimes it happens when we go to bed and try to fall asleep but couldn't. There is a website which helps you fall asleep.
This websites plays an endless sound like its raining heavily. The sounds of thunderstorms in between adds to its beauty. All you have to do is open this website www.rainymoods.com in your browser and tap the PLAY icon as shown in the picture.
The soothing sound of rain and thunderstorms relax you and help you fall asleep. 
Give it a try
They do have an app for android as well as IOS
Note: For best results use your headphones. 
Read More »

Jun 20, 2020

How to find your TwinStranger


Hi Friends. 
Hope u are doing well. Today I am back with an interesting post. You know it is said that, for every person living in this world there are 7 more people with a same face. Well is it a fact or just myth i dont know. However in todays post i will tell you about a website which can find u your twin stranger across the globe. Yes thats true, all u hv to do is upload your photograph on this site and click search. This site will search for all the persons reassembling you. It will display their photographs, their country flag, link to their facebook profile. 
So what are u waiting for CLICK HERE and find your twinstranger. 
Read More »

Jan 3, 2019

How to get 1TB of free data storage on Google drive


Hi Guyz....
Today i will tell you an awesome trick by which you will get 1TB of free data storage space on your Google Drive.
So Let's Begin. . .

REQUIREMENTS:
For this trick you will need more than one account of gmail. Each account will grant you 15GB of storage.
Follow the steps below:

Step 1) Login to your first account

Step 2) Go to google drive

Step 3) Create a folder

Step 4) right click the folder

Step 5) Click share with

Step 6) it will grant you the option to type a Gmail. Input your main Gmail account that you want its storage to increase.

Step 7) Once done click the done button after you type the main Gmail
account of yours.

Step 8) Login to your second account

Step 9) Repeat step 2,3,4,5,6,7

Step 10) Login to your third account

Step 11) Repeat step 2,3,4,5,6,7

Keep doing that as much as you want until you get the desired
storage space ( Each account grant +15GB of free storage to
your main account)

Step 12) Login to the drive of your main Gmail account and you will
see the folder on the right side.

Step 13) Right click them and click add to my drive

It will be added to your drive where you can edit, move, remove,
add anything you wish to any storage of any account from your own Gmail account, therefore, granting you with about 100 GB data storage space.
Read More »

Aug 19, 2018

How to disable BitLocker encryption

BitLocker is a good option to lock any of our hard disk drives on our computer, but sometimes it causes inconvienience and we need to disable the BitLocker. though it is easy to disable the BitLocker encryption, but users find it difficult to locate this option.
BitLocker can be disabled using the following Steps-


Step1: Click Start button. (See Fig1)
How to disable BitLocker encryption
Fig1


Step2: Cick Control Panel. (See Fig2)
How to disable BitLocker encryption
Fig2


Step3: Click System and Security. (See Fig3)
How to disable BitLocker encryption
Fig3


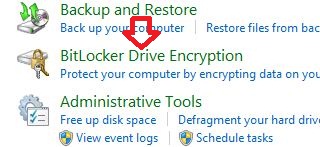
Step4: Now click BitLocker Drive Encryption.(See Fig4)

How to disable BitLocker encryption
Fig4


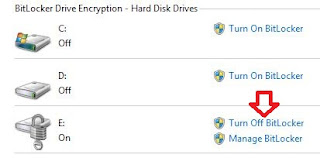
Step5: Look for the drive on which you want BitLocker Drive Encryption turned off, and click Turn Off BitLocker(See Fig5)
How to disable BitLocker encryption
Fig5


Step6: A message will be displayed, stating that the drive will be decrypted and that decryption may take some time. Click Turn off Bitlocker / Decrypt the drive. (See Fig6)

How to disable BitLocker encryption
Fig6


Take a cup of tea and wait as this might take some time to decrypt the drive and remove BitLocker protection.

Done....!!!
Happy Learning....!!
Read More »

Aug 17, 2018

How to Install Microsoft office Picture Manager


Microsoft Office Picture Manager is a raster graphics editor introduced in Microsoft Office 2003 and included up to Office 2010. It is the replacement to Microsoft Photo Editor, which itself was introduced in Office 97 and included up to Office XP. 


Microsoft Office Picture Manager is a must have tool for windows. If this tool is not included in your MS Office package, you can still install it.

To Install Microsoft Office Picture Manager Follow the steps below:-

Step1: Download SharePoint Designer 2007.

Step2: In the Choose the download you want page, select SharePointDesigner.exe and click Next.

Step3: In the message (at the bottom of your screen) that asks if you want to Run or Save the .exe file, click Run.

Step4: Accept the license terms and click Continue.

Step5: On the Choose the installation you want page, click Customize.

Step6: Expand Microsoft Office SharePoint Designer and select Microsoft Office Picture Manager.

Step7: Click the drop-down arrow next to Microsoft Office Picture Manager and click Run from my computer.

Step8: Click Install Now.

All Done......!! You have successfully added MS Office Picture manager to your Computer.

Any Questions? Leave a comment.
Happy Learning.....!!!
Read More »
Blogger Widgets